Do you want to learn how to connect letters in Cricut Design Space? It’s actually a really easy process, and we’re going to show you how it’s done! In this tutorial, we’ll walk you through the steps of connecting two or more letters together. This can be a great way to create custom monograms and logos for your business, or just to add a special touch to your projects. Let’s get started!
What is Cricut Design Space and how does it work
Cricut Design Space is a free software program that allows you to create and edit designs for Cricut cutting machines. The program is web-based, so it can be accessed from any computer with an internet connection. Design Space has a library of built-in images and fonts, or you can upload your own images and fonts. Once you’ve created your design, you can save it to your account and access it from any device. You can also share designs with other Cricut users. When you’re ready to cut your design, you’ll need to connect your Cricut machine to Design Space using a USB cable. Then, follow the prompts to select your material and cutting settings. Finally, hit the “Cut” button and watch your Cricut do its magic!
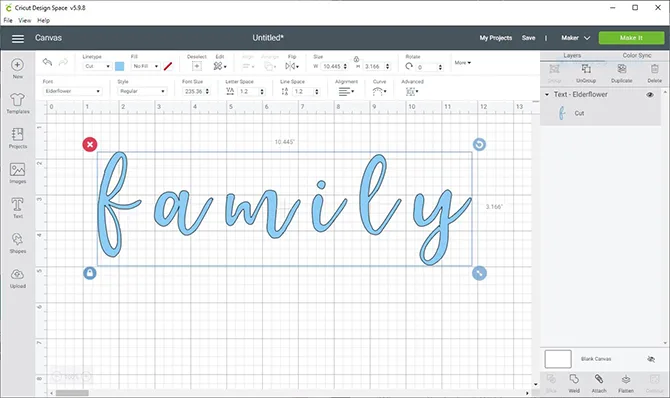
How to connect letters in Cricut Design Space
Cricut Design Space is a great way to create unique letters for your projects. You can use the connection tools to join letters together, or you can add other elements to help them stand out. To connect letters in Cricut Design Space, start by selecting the ‘Text’ tool. Then, click on the first letter you want to connect and type in the text you want to use. Next, click on the ‘Connect’ tool and then click on the second letter you want to connect. Cricut Design Space will automatically connect the letters for you. You can also add additional elements, such as shadows or outlines, to further customize your letters. With a little practice, you’ll be able to create beautiful, one-of-a-kind letters for all your projects.
Creating custom monograms and logos with Cricut Design Space
Design Space is a great way to create custom monograms and logos. You can use any image or font that you have on your computer, and there are plenty of built-in designs to choose from as well. The best part is that you can use Design Space to create products for sale, or simply to make personalized gifts for friends and family. If you’re selling products, you can even set up a shop so that customers can purchase your designs directly from your website. Whether you’re a professional designer or just getting started, Design Space is a great way to create unique designs that will stand out from the crowd.
Tips and tricks for using Cricut Design Space
Cricut Design Space is a great way to create custom designs for your Cricut machine. However, it can take a bit of practice to get the hang of it. Here are a few tips and tricks to help you get the most out of Cricut Design Space:
-To upload your own images, use the Image Upload tool. Simply select the image you want to upload, then click on the “Upload” button.
-To resize an image, select it, then click on the “Resize” button. You can then enter in the new dimensions you want.
-To edit an image, select it, then click on the “Edit” button. This will bring up a menu of editing tools that you can use to make changes to your image.
-To save your design, click on the “File” menu and then select “Save As”. This will bring up a dialog box where you can enter a name for your design and choose where to save it.
By following these tips and tricks, you’ll be able to get the most out of Cricut Design Space and create amazing designs for your projects.
FAQs about how to connect letters in Cricut Design Space
Here are some answers to frequently asked questions about how to connect letters in Cricut Design Space:
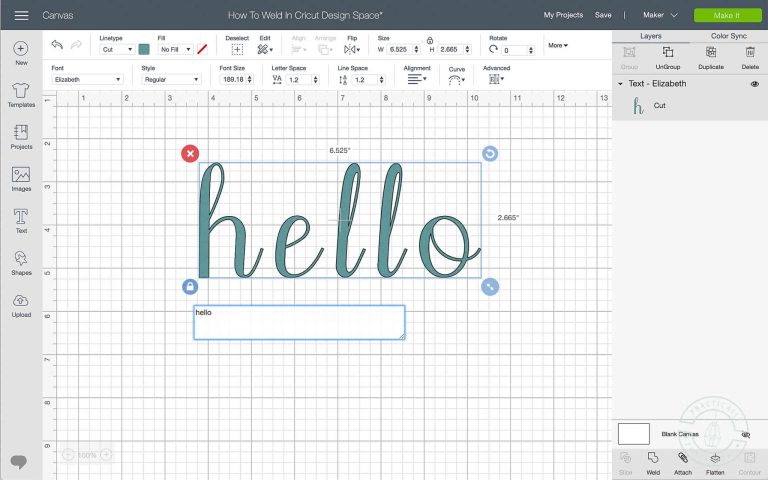
How do I connect two letters?
To connect two letters, select both letter objects and then click the “Attach” button in the upper toolbar. The letters will now be connected as one object.
Can I connect more than two letters?
Yes, you can connect as many letters as you want using the same method. Simply select all the letter objects you want to connect and then click “Attach.”
What if I want to disconnect two letters?
To disconnect two connected letters, select the entire object and then click the “Detach” button in the upper toolbar. This will break the connection between the letters and allow you to move them independently.
How do I know if my letters are properly connected?
When you hover over a connected group of letters, you should see a blue line connecting the letters together. If you don’t see a blue line, the letters are not properly connected.
Can I resize connected letters?
Yes! Just click on the “Resize” button in the bottom right corner of the screen. Then use the slider to make your letters bigger or smaller.
What if I want to move one of the connected letters?
Just click on the “Move” button in the bottom right corner of the screen, then click and drag the letter to where you want it. You can also use the arrow keys on your keyboard to nudge it into place.
What if I want to connect two separate words?
You can still use the “Weld” tool to connect two words. Just make sure that each word is selected before you click on the “Weld” icon. Otherwise, you’ll end up with one big blob of connected letters!
Can I use this technique to connect shapes as well as letters?
Yes! The “Weld” tool can be used to connect any type of shape, not just letters. So feel free to experiment and see what kinds of designs you can create.
Conclusion
Connecting letters in Cricut Design Space is a great way to create custom designs for your projects. By following the tips and tricks in this article, you’ll be able to get the most out of the tool and create amazing designs that will stand out from the crowd.