You are currently viewing How to Paint Furniture and Protect it from Chipping

How to Paint Furniture and Protect it from Chipping

When you are painting furniture, it is essential to take steps to prevent it from chipping. If you don’t take precautions, the paint can chip off quickly and leave your furniture looking terrible. This blog post will discuss some tips that will help you protect your furniture from chipping while you are painting it!

Choose the right paint for your furniture.

When it comes to painting furniture, there are a few things you need to take into account to choose the right paint. The type of furniture, the kind of finish you want, and the level of wear and tear will all play a role in determining which color is best for your project. For example, if you’re painting a piece of living room furniture that gets a lot of use, you’ll want to choose durable paint that can withstand some wear and tear. Conversely, if you’re painting a dresser used mainly for decorative purposes, you can select less durable paint to give your furniture a more finished look. Ultimately, the best way to choose the right color for your furniture is to experiment.

Protect the surface of your furniture with a primer

Before you start painting that old dresser or bookshelf, it’s essential to protect the surface of your furniture with a primer. This will help keep the paint from chipping or peeling off. There are a few different types of primers available, so you’ll need to choose one right for the kind of paint you’ll be using. For example, if you’re planning on using latex paint, look for a primer designed explicitly for latex. Once you’ve chosen the suitable primer, apply it to the surface of your furniture according to the instructions on the packaging. Then, once it’s dry, you can start painting away. 

Paint in thin, even layers for best results

There are a few things to keep in mind to get the best results for painting. First, it’s important to use thin, even layers of paint. This will help to minimize brush strokes and ensure an even finish. Second, allow each layer of pigment to dry completely before adding the next. This will prevent the color from becoming too thick and uneven. Finally, if you’re using light-colored paint, it’s a good idea to prime the surface first. This will help prevent the color from becoming dull or yellowed over time. 

Let the paint dry completely before applying a sealant.

Applying a sealant is an essential part of the painting, but it’s necessary to let the paint dry thoroughly first. If you use the adhesive too soon, it can cause the color to bubble and peel. But if you wait too long, the paint may start to yellow and fade. The best time to apply a sealant is usually about 24 hours after you finish painting. So, if you’re planning on painting your house, be sure to factor in some time for the sealant to dry. And if you’re not sure, it’s always better to err on the side of caution and wait a little longer rather than risk damaging your paint job.

Liquid Rubber Color Waterproof Sealant - Multi-Surface Leak Repair
9.7
  • PROTECTIVE FINISH FOR - Flat roofs, metal roofs, sloped roofs, planter boxes, foundations, sheds, basements, metal, wood, concrete and more
  • PROTECTIVE FINISH FOR - Flat roofs, metal roofs, sloped roofs, planter boxes, foundations, sheds, basements, metal, wood, concrete and more
  • HIGHLY FLEXIBLE & DURABLE - Final membrane has over 1000% elongation preventing adhesion failure, and is UV Stable stopping the sun from degrading the product
  • COVERAGE - Vertical Surfaces - 1 gallon/30 sq ft (2.8 sq m). 3-4 heavy coats to achieve a 30 mil (0.76 mm) membrane. Flat/Ponding Surfaces - 1 gallon/15 sq ft (1.4 sq m). 4-5 heavy coats to achieve a 60-80 mil (1.5-2 mm) membrane
  • ENVIRONMENTALLY FRIENDLY - Liquid Rubber Waterproof Sealant/Coating is water based, containing no solvents, VOC's or harmful odors. Safe for humans and pets alike, can be used indoors and outdoors with no special breathing apparatus
  • FOR A BULLETPROOF SYSTEM - Bridge joints, seams, vents, gaps, protrusions…. With Liquid Rubber Seam Tape or Liquid Rubber Geo-Textile where possible movement may occur
1 gal Minwax 13333 Clear Polycrylic Water-Based Protective Finish Satin
9.5
  • PROTECT WOOD SURFACES – Minwax Polycrylic Protective Finish protects and adds beauty to your interior wood projects, including woodwork, furniture, doors and cabinets. The clear top coat protects against scratches, spills, dirt and more.
  • CRYSTAL CLEAR FINISH THAT LASTS – The crystal clear finished offered in this protective coating is ideal for use over all Minwax Oil-Based and Water-Based Stains and colors, as well as all wood species including light woods like maple, ash and birch.
  • SATIN SHEEN – Give your wood projects a sleek finish with this satin clear varnish. It not only protects the natural beauty of the wood, but offers an attractive, classic sheen for a modern and subtle look. It’s non-yellowing, non-ambering and low odor.
  • ULTRA FAST DRYING – Get more done with this protective poly coating. It’s a fast-drying clear coat, which allows for quick recoats after 2 hours, letting you get projects done faster. Be sure to apply with a high-quality synthetic bristle brush.
  • EASY CLEAN UP – This water-based wood finish allows for easy soap and water clean-up, so you don’t have to stress about spills and big messes.
FIBERLOCK A-B-C Bridging Encapsulant (Off White) - Fireproof Sealant
9.1
  • ASBESTOS SEALER: Asbestos sealant is used for encapsulating fireproofing and insulation material. Ensures long lasting barrier over lead paint. Apply ABC full strength as a bridging encapsulant.
  • ASBESTOS SEALER: Asbestos sealant is used for encapsulating fireproofing and insulation material. Ensures long lasting barrier over lead paint. Apply ABC full strength as a bridging encapsulant.
  • CLASS A FIRE RATED: Our ABC encapsulant is class A fire rated. Water-based and ensures desirable results. Exceeds EPA standards for encapsulation.
  • INSTRUCTION FOR USE: Tools and dripping’s should be cleaned with warm soapy water before coating dries. Apply as a penetrating encapsulant to increase the dimensional stability of the soil, while reducing its porosity.
  • SURFACE PREPARATION: Before applying the asbestos encapsulant, it is important to determine if the existing asbestos matrix well adheres to the substrate. Correct any surface defects and clean all surfaces thoroughly.
  • COVERAGE: Typical bridging applications are applied at a coverage rate of 75-100 sq. ft./gallon, which yields a dry film thickness between 6-10 mils on hard, cementitious ACM. This fireproof foam sealant is available in off-white, clear and green.

Here are answers to some frequently asked questions about painting furniture:

What kind of paint should I use?

For best results, use a latex primer and paint designed specifically for use on furniture. You can find these at most hardware or home improvement stores.

How do I prep the piece of furniture before painting?

First, remove all hardware from the piece. Then, sand down the surface to create a smooth base for the primer and paint. Once you’ve sanded, wipe

How to avoid the furniture from chipping

Chipped furniture is a common problem, but it is easy to avoid with care. When moving furniture, be careful not to scrape it against the floor or walls. This can cause the finish to chip off. In addition, try to avoid placing hot items directly on furniture surfaces. Heat can cause the finish to weaken and bubble, making it more susceptible to chipping. If you accidentally chip your furniture, you can do a few things to repair it. For minor chips, you can use a matching paint or wood filler. Larger chunks may require more extensive repairs, but they can usually be hidden with touch-up kits or by carefully placing a piece of furniture against them. 

How to Fix Chipping furniture?

Chipping furniture can be a real pain. Whether it’s your favorite chair or that dresser you just bought, seeing those chips can ruin the look of an otherwise perfect piece, but don’t despair! There are a few easy ways to fix chipped furniture and get it looking good as new.

One way to fix chipped furniture is to use wood filler. Wood filler comes in a variety of colors to match your furniture’s color. Apply the filler to the chip with a putty knife, let it dry, and then sand it smooth.

Another way to fix chipped furniture is to use spray paint. This is an excellent option if you want to change the color of your furniture or if you’re trying to cover up a lot of chips. Sand the furniture down, apply a primer, and then spray paint it with the color of your choice. Let the paint dry completely before using the table.

These are just a few easy ways to fix chipped furniture. With a little bit of time and effort, your furniture looks good as new. So don’t let those chips ruin your favorite pieces – fix them up and enjoy them for years!

Water-Based Wood & Grain Filler (Trowel Ready)
9.7
  • ⚒️ HIGH QUALITY & MONEY SAVING: Save time and money with this wood filler that does not shrink, sink, or crack, and has excellent adhesion. Only need to apply once, and it flawlessly accepts any finish or stain! In fact, this product can be mixed with any pigment, tint, stain or dye.
  • ⚒️ DESIGNED FOR PROFESSIONAL WOODWORKERS: The only water-based, non-latex/acrylic, trowel-ready wood filler in the world.
Gorilla All Purpose Wood Filler, 16 Ounce Tub
9.5
  • Gorilla All Purpose Wood Filler is the go-to product for strong, durable repairs on cracks, gouges and holes.
  • The unique formula is easy to spread allowing for a smooth, natural finish.
  • Its high performance stainability, paintability, and sandability provides you with a professional looking finished project.
  • Shrink & Crack Resistant
  • Interior/ Exterior; Water Resistant
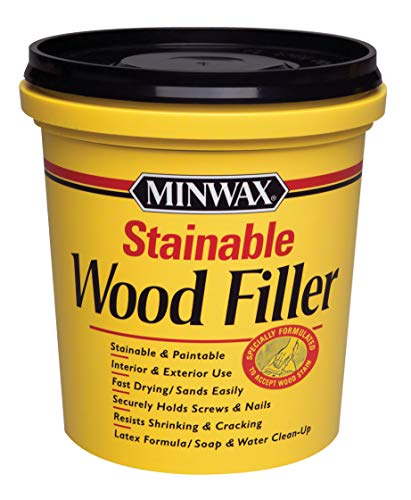
Minwax 42853000 Stainable Wood Filler
9.1
  • Ideal for repairing cracks, small gouges, nail holes, knot holes and other defects in all types of unfinished indoor and outdoor wood surfaces
  • Stainable Wood Filler is specially formulated to accept Minwax penetrating wood stains
  • It is designed for use with oil-based and water-based wood stains
  • Wood filler
  • Stainable and paintable
  • Interior and exterior use
  • Fast drying
  • Sands easily

Should I put a clear coat on painted furniture?

One of the most common questions we get asked here at our furniture store is whether or not painted furniture should have a clear coat applied. While there is no right or wrong answer to this question, there are a few things you should take into consideration before making your decision. One of the main benefits of applying a clear coat to painted furniture is that it can help to protect the underlying paint job from wear and tear. Clear coats can also help resist staining and fading, keeping your furniture looking new for longer. On the other hand, clear coats can sometimes give painted furniture a slightly glossy appearance that some people prefer to avoid. Ultimately, whether or not to apply a clear coat to your painted furniture is a personal one.

Should you polyurethane over-paint on furniture?

There are a few different options available when it comes to protecting painted furniture. One popular option is to apply a layer of polyurethane over the paint. This will create a durable barrier that will help to prevent chips and scratches. However, it is essential to note that polyurethane can yellow over time, so it is not always the best choice for light-colored paint. Another option is to use a clear wax. This will provide some protection without changing the color of the paint. Finally, you can also leave the paint unprotected. This is not recommended for high-traffic areas, but it can be a good option if you plan to repaint soon anyway. Ultimately, the best choice will depend on your specific needs and preferences.

Conclusion

What are you waiting for now that you know how to paint furniture and protect it from chipping? Get started on that project you’ve been dreaming of! With a bit of preparation and the right supplies, you can have a beautiful piece of furniture that will last for years. Thanks for following along with our tutorial – we hope you found it helpful.