
You probably use your Cricut machine a lot if you’re like me! It’s an excellent tool for making all sorts of projects. But if you don’t clean it regularly, the sensor light can get dirty and cause problems. This blog post will show you how to clean the sensor light on your Cricut machine.
What is the sensor light on your Cricut machine and what does it do?
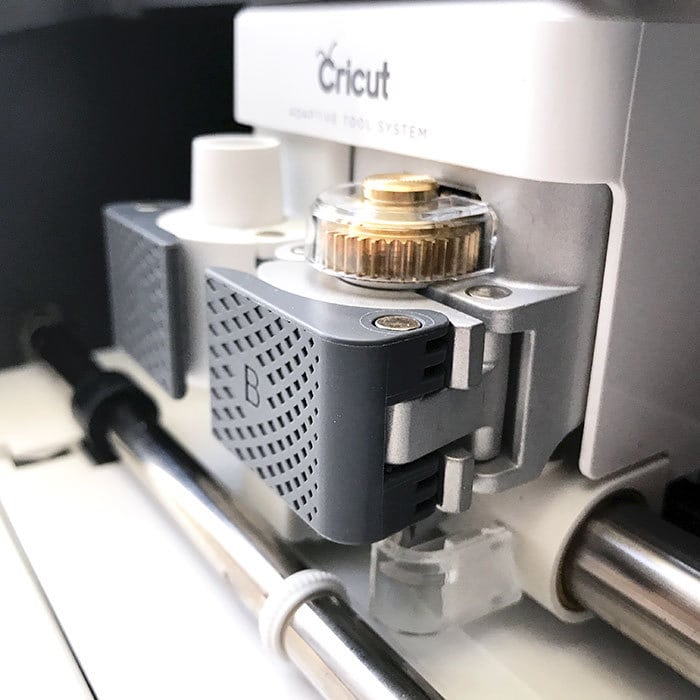
The sensor light on your Cricut machine is a safety feature that helps to prevent the blade from cutting into your fingers. When the edge is extended, the sensor light will turn on, and it will remain on as long as the blade is extended. If the sensor light turns off, the blade has been retracted, and it is safe to touch the edge. The sensor light is just one of the many safety features on your Cricut machine, and it is an essential part of ensuring that you have a safe and enjoyable crafting experience.
How to clean the sensor light on your Cricut machine
If your Cricut machine isn’t working as well as it used to, one possible culprit is a dirty sensor light. Over time, the sensor light can become covered in dust and debris, interfering with its ability to read the cutting mat properly. Fortunately, it’s easy to clean the sensor light and only takes a few minutes. First, power off the machine and unplug it from the power source. Then, use a soft cloth to wipe the sensor light lens gently. Be careful not to touch any other parts of the machine, as you could damage them. Once the lens is clean, reattach the housing and power on the machine. You should notice an immediate difference in performance.
Why is it important to keep the sensor light clean on your Cricut machine?
If you’ve ever owned a Cricut cutting machine, you know how frustrating it can be when the sensor light gets dirty. The sensor light tells the machine where to cut, so the cuts will be inaccurate if it’s covered in dust or fingerprints. This is frustrating, but it can also waste materials and ruin your projects. In some cases, you might even have to recalibrate the machine. Thankfully, there are a few easy ways to keep the sensor light clean. First, make sure to wipe it down with a lint-free cloth after every use. You can also use compressed air to blow away any dust particles. Finally, if the sensor light is foul, you can use a cotton swab dipped in rubbing alcohol to clean it. Just be sure not to use too much pressure, as you don’t want to damage the light. With a little bit of care, you can keep your Cricut machine cutting accurately for years to come.
How do I know if the sensor light needs cleaning?
Most sensor lights have a little green or red light that indicates whether the sensor is working. If the light is green, the sensor is working, and you don’t need to clean it. However, if the light is red or there is no light, the sensor is not working and will need to be cleaned.
How often should I clean the sensor light?
The sensor light is an integral part of your security system, and it should be kept clean to ensure that it functions properly. The frequency with which you need to clean the sensor will depend on the environment it is located in. If the sensor is exposed to dust or debris, you may need to clean it more often. It is good to check the sensor every month and clean it as needed. Use a soft cloth or brush to remove any dust or dirt accumulated on the surface to clean the sensor. Once the sensor is clean, your security system will be able to function at its best.
How do I fix my Cricut sensor light?
If your Cricut sensor light is not working, there are a few things you can try to fix the issue. First, make sure that the power cord is plugged in and that the machine is turned on. Next, check the connections between the device and the computer to ensure they are secure. Finally, restart the software program you are using to operate the machine. If none of these steps work, you may need to replace the lightbulb or contact Cricut customer service for assistance.
Tips for keeping the sensor light clean on your Cricut machine
As anyone who has ever used a Cricut machine knows, keeping the sensor light clean is one of the most important things to keep in mind. This small light is responsible for detecting the design on the cutting mat and sending the information to the machine, so it must be kept free of dust and debris. Fortunately, a few simple tips can help keep your sensor light clean and working correctly. First, be sure to wipe down the sensor light with a soft, dry cloth after each use. You can also use a canned air duster to remove any dust build-up. Finally, if you notice that the sensor light is not working as well as it should, you can try cleaning it with a cotton swab dipped in rubbing alcohol.
By following these simple tips, you can help keep your Cricut machine running smoothly and ensure that it continues to produce excellent results. So don’t neglect the sensor light – give it a little TLC, and it will take care of you!
Additional resources about cleaning the sensor light on your Cricut machine
If you’re having trouble cleaning the sensor light on your Cricut machine, a few additional resources can help. One is the Cricut support forum, where users can ask questions and share tips. Another is the Cricut YouTube channel, which has several helpful videos on topics like cleaning and maintenance. Finally, several third-party websites offer step-by-step instructions for cleaning the sensor light. With a little bit of research, you should be able to find the information you need to get your Cricut machine running smoothly again.
Conclusion
And that’s it! You have now successfully cleaned the sensor light on your Cricut machine. If you ever notice that your cuts are not coming out as clean as they should, or if the blade seems to be skipping over the material, give this a try – it might just do the trick. Thanks for reading, and happy crafting!


